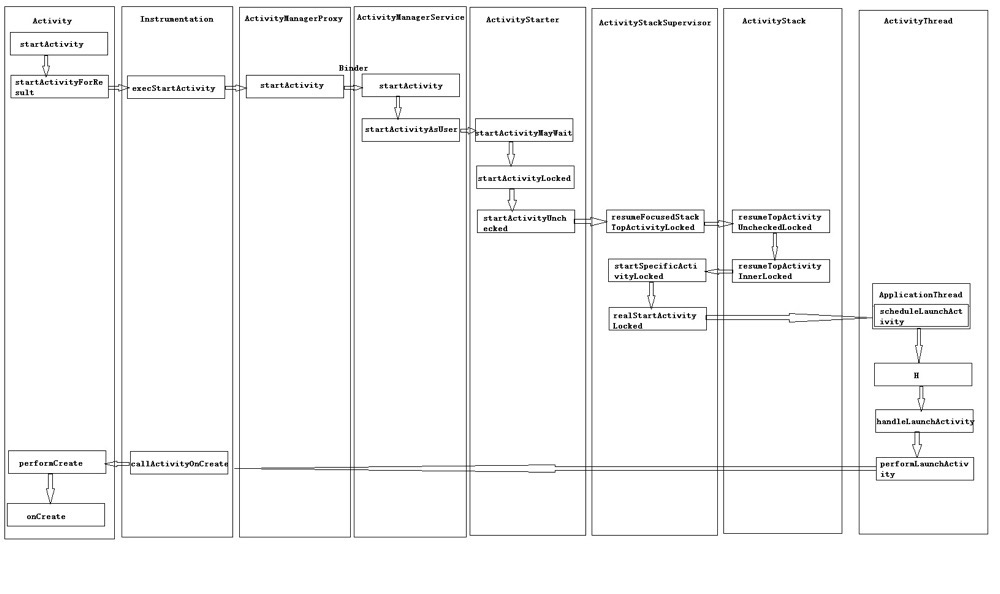
Activity启动流程分析

Activity

startActivity

1
2
3
4
5
6
7
8
9
10
11
12
13
@Override
public void startActivity(Intent intent) {
this.startActivity(intent, null);
}

@Override
public void startActivity(Intent intent, @Nullable Bundle options) {
if (options != null) {
startActivityForResult(intent, -1, options);
} else {
startActivityForResult(intent, -1);
}
}

startActivityForResult

1
2
3
4
5
6
7
8
9
10
11
12
13
14
15
16
17
18
19
20
21
22
23
24
25
26
27
28
29
public void startActivityForResult(@RequiresPermission Intent intent, int requestCode) {
startActivityForResult(intent, requestCode, null);
}

public void startActivityForResult(@RequiresPermission Intent intent, int requestCode,
@Nullable Bundle options) {
if (mParent == null) {
options = transferSpringboardActivityOptions(options);
Instrumentation.ActivityResult ar =
mInstrumentation.execStartActivity(
this, mMainThread.getApplicationThread(), mToken, this,
intent, requestCode, options);
if (ar != null) {
mMainThread.sendActivityResult(
mToken, mEmbeddedID, requestCode, ar.getResultCode(),
ar.getResultData());
}
if (requestCode >= 0) {
mStartedActivity = true;
}
cancelInputsAndStartExitTransition(options);
} else {
if (options != null) {
mParent.startActivityFromChild(this, intent, requestCode, options);
} else {
mParent.startActivityFromChild(this, intent, requestCode);
}
}
}

我们直接看mParent == null就行了,下面的已经是远古级别了,已经被fragment淘汰,暂且不论。前者关键方法mInstrumentation.execStartActivity(),返回回调结果。Instrumentation拿来测试过的同学并不陌生,这里且当它是个黑科技工具。

execStartActivity

1
2
3
4
5
6
7
8
9
10
11
12
public ActivityResult execStartActivity(
Context who, IBinder contextThread, IBinder token, Activity target,
Intent intent, int requestCode, Bundle options) {
...
int result = ActivityManagerNative.getDefault()
.startActivity(whoThread, who.getBasePackageName(), intent,
intent.resolveTypeIfNeeded(who.getContentResolver()),
token, target != null ? target.mEmbeddedID : null,
requestCode, 0, null, options);
checkStartActivityResult(result, intent);
...
}
  • who:正在启动该Activity的上下文
  • contextThread:正在启动该Activity的上下文线程,这里为ApplicationThread
  • token:正在启动该Activity的标识
  • target:正在启动该Activity的Activity,也就是回调结果的Activity

checkStartActivityResult

1
2
3
4
5
6
7
8
9
10
11
12
13
14
15
16
17
18
19
20
21
22
23
24
25
26
27
28
29
30
31
32
33
34
35
36
37
38
39
40
public static void checkStartActivityResult(int res, Object intent) {
if (res >= ActivityManager.START_SUCCESS) {
return;
}
switch (res) {
case ActivityManager.START_INTENT_NOT_RESOLVED:
case ActivityManager.START_CLASS_NOT_FOUND:
if (intent instanceof Intent && ((Intent)intent).getComponent() != null)
throw new ActivityNotFoundException(
"Unable to find explicit activity class "
+ ((Intent)intent).getComponent().toShortString()
+ "; have you declared this activity in your AndroidManifest.xml?");
throw new ActivityNotFoundException(
"No Activity found to handle " + intent);
case ActivityManager.START_PERMISSION_DENIED:
throw new SecurityException("Not allowed to start activity "
+ intent);
case ActivityManager.START_FORWARD_AND_REQUEST_CONFLICT:
throw new AndroidRuntimeException(
"FORWARD_RESULT_FLAG used while also requesting a result");
case ActivityManager.START_NOT_ACTIVITY:
throw new IllegalArgumentException(
"PendingIntent is not an activity");
case ActivityManager.START_NOT_VOICE_COMPATIBLE:
throw new SecurityException(
"Starting under voice control not allowed for: " + intent);
case ActivityManager.START_VOICE_NOT_ACTIVE_SESSION:
throw new IllegalStateException(
"Session calling startVoiceActivity does not match active session");
case ActivityManager.START_VOICE_HIDDEN_SESSION:
throw new IllegalStateException(
"Cannot start voice activity on a hidden session");
case ActivityManager.START_CANCELED:
throw new AndroidRuntimeException("Activity could not be started for "
+ intent);
default:
throw new AndroidRuntimeException("Unknown error code "
+ res + " when starting " + intent);
}
}

这些异常你都见过吗?它就是根据返回码和intent抛出相应异常,最熟悉的就是activity没有在AndroidManifest里面注册了。这其实不是我们今天要讲的关键,在这个方法中,我们还发现了熟悉的字眼startActivity,但调用者却很陌生ActivityManagerNative.getDefault(),这到底是什么玩意?

ActivityManagerNative.getDefault()

1
2
3
4
5
6
7
8
9
10
11
12
13
14
15
16
static public IActivityManager getDefault() {
return gDefault.get();
}
private static final Singleton<IActivityManager> gDefault = new Singleton<IActivityManager>() {
protected IActivityManager create() {
IBinder b = ServiceManager.getService("activity");
...
IActivityManager am = asInterface(b);
...
return am;
}
};
static public IActivityManager asInterface(IBinder obj) {
...
return new ActivityManagerProxy(obj);
}

这样看下来好像是ServiceManager构建了一个key为activity的对象,该对象作为ActivityManagerProxy的参数实例化创建单例并get返回。这里先不作解析,继续连接上面的流程ActivityManagerNative.getDefault().startActivity(…)。我们已经知道startActivity方法其实是ActivityManagerProxy调的,我们再来看看。

ActivityManagerProxy.startActivity

1
2
3
4
5
6
7
8
9
10
11
12
public int startActivity(IApplicationThread caller, String callingPackage, Intent intent,
String resolvedType, IBinder resultTo, String resultWho, int requestCode,
int startFlags, ProfilerInfo profilerInfo, Bundle options) throws RemoteException {
Parcel data = Parcel.obtain();
Parcel reply = Parcel.obtain();
...
mRemote.transact(START_ACTIVITY_TRANSACTION, data, reply, 0);
...
reply.recycle();
data.recycle();
return result;
}

如果对transact比较熟悉的话,那就很棒了,可以直接跳到下一节。不懂的同学继续,这里引入了Binder的概念,那么Android为什么要引入呢?这样说来ActivityManagerProxy是不是个代理类啊?为什么要引入,我不正面回答,假如我们要跨进程服务通信,你是不是先创建一个xx.aidl文件,然后会自动生成一个xx.java文件。你有没有仔细看过里面的内容呢?没看过的可以去看看。你会发现惊人的相似,如果是同一进程,我相信没人会这么做吧?从这些我们平时的开发经验来看,这玩意貌似用在跨进程通信上,就上面栗子来说,我们可以通过Service返回的Binder(其实就是个代理类)调用远程的方法,我们的Activity相当于客户端,而Service相当于服务端,这里也是一样,代理类就是ActivityManagerProxy。而真正传输数据的是mRemote.transact,简单介绍下,第一个参数code是告诉服务端,我们请求的方法是什么, 第二个参数data就是我们所传递的数据。这里比较纠人的是为什么要跨进程?这个你得了解下应用的启动过程了,这里我针对本篇文章简单的科普一下,应用启动会初始化一个init进程,而init进程会产生Zygote进程,从名字上看就是一个受精卵,它会fork很重要的SystemServer进程,比较著名的AMS,WMS,PMS都是这玩意启动的,而我们的应用进程也是靠AMS通信告诉Zygote进程fork出来的,因此需要跨进程通信,顺便解答下上面没回答的问题,ServiceManager构建的就是我们传说中的AMS。花了比较长的篇幅介绍Binder,也是无奈之举,帮助你们理解,但只是简单的介绍,有些细节并没有介绍,大家大可文外系统化地了解,很复杂,嘿嘿。

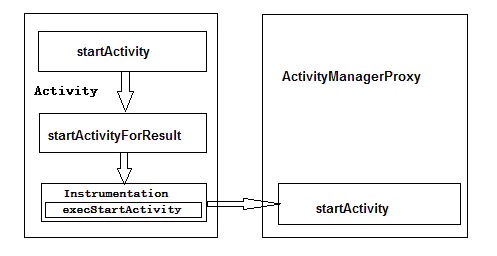
ActivityManagerService

startActivity

通过代理类ActivityManagerProxy调用了startActivity方法,让我们来搜寻一下AMS的startActivity方法。

1
2
3
4
5
6
@Override
public final int startActivity(IApplicationThread caller, String callingPackage,
Intent intent, String resolvedType, IBinder resultTo, String resultWho, int requestCode,
int startFlags, ProfilerInfo profilerInfo, Bundle bOptions) {
return startActivityAsUser(caller, callingPackage, intent, resolvedType, resultTo,resulUserHandle.getCallingUserId());
}

  • caller:就是我们的whoThread,见Instrumentation参数分析
  • callingPackage:包名
  • intent:意图
  • resolvedType:就是我们AndroidManifest注册时的MIME类型
  • resultTo:就是我们的token,见Instrumentation参数分析
  • resultWho:就是我们target的id
  • requestCode:这个就不说了
  • startFlags:启动标志,默认传0
  • profilerInfo:默认传null
  • options:略过

由于篇幅过长,接下来可能不会仔细分析参数,请大家顺着参数的走向或者参数名理解。
AMS的startActivity方法什么都没做,直接调了startActivityAsUser方法,我们来看看这是什么东西?

startActivityAsUser

1
2
3
4
5
6
7
8
@Override
public final int startActivityAsUser(IApplicationThread caller, String callingPackage,
Intent intent, String resolvedType, IBinder resultTo, String resultWho, int requestCode,
int startFlags, ProfilerInfo profilerInfo, Bundle bOptions, int userId) {
enforceNotIsolatedCaller("startActivity");
userId = mUserController.handleIncomingUser(Binder.getCallingPid(), Binder.getCallingUid(),userId, false, ALLOW_FULL_ONLY, "startActivity", null);
return mActivityStarter.startActivityMayWait(caller, -1, callingPackage, intent,resolvedType, null, null, resultTo, resultWho, requestCode, startFlags,profilerInfo, null, null, bOptions, false, userId, null, null);
}

其中enforceNotIsolatedCaller方法是检查是否属于被隔离的对象。mUserController.handleIncomingUser检查操作权限然后返回一个用户id(涉及到Linux,有兴趣的同学可以翻阅翻阅,这不是我们的重点),startActivityAsUser方法大概就是检测下权限,然后返回由mActivityStarter(ActivityStarter,可以这么说,关于Activity启动的所有信息都在这了,然后根据信息把Activity具体分配到哪个任务栈)调用的startActivityMayWait方法。

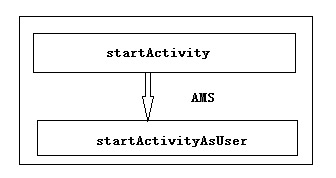
继续跟踪ActivityStarter的startActivityMayWait的方法。

startActivityMayWait

1
2
3
4
5
6
7
8
9
10
11
12
13
14
15
16
17
18
19
20
21
22
23
24
25
26
final int startActivityMayWait(IApplicationThread caller, int callingUid,
String callingPackage, Intent intent, String resolvedType,
IVoiceInteractionSession voiceSession, IVoiceInteractor voiceInteractor,
IBinder resultTo, String resultWho, int requestCode, int startFlags,
ProfilerInfo profilerInfo, IActivityManager.WaitResult outResult, Configuration config,
Bundle bOptions, boolean ignoreTargetSecurity, int userId,
IActivityContainer iContainer, TaskRecord inTask) {
...
ResolveInfo rInfo = mSupervisor.resolveIntent(intent, resolvedType, userId);
...
ActivityInfo aInfo = mSupervisor.resolveActivity(intent, rInfo, startFlags, profilerInfo);
...
final ProcessRecord heavy = mService.mHeavyWeightProcess;
if (heavy != null && (heavy.info.uid != aInfo.applicationInfo.uid
|| !heavy.processName.equals(aInfo.processName))) {
...
}
...
int res = startActivityLocked(caller, intent, ephemeralIntent, resolvedType,
aInfo, rInfo, voiceSession, voiceInteractor,
resultTo, resultWho, requestCode, callingPid,
callingUid, callingPackage, realCallingPid, realCallingUid, startFlags,
options, ignoreTargetSecurity, componentSpecified, outRecord, container,
inTask);
...
}

mSupervisor(ActivityStackSupervisor)简单来说就是用来管理ActivityStack的,后来新增的。resolveIntent和resolveActivity方法用来确定此次启动activity信息的。关于heavy(ResolveInfo)涉及到重量级进程(SystemServer, MediaServer,ServiceManager),如果当前系统中已经存在的重量级进程且不是即将要启动的这个,那么就要给Intent赋值。接下来继续走我们的探索之路startActivityLocked。

startActivityLocked

1
2
3
4
5
6
7
8
9
10
11
12
13
14
15
16
17
18
19
20
21
22
23
24
final int startActivityLocked(IApplicationThread caller, Intent intent, Intent ephemeralIntent,
String resolvedType, ActivityInfo aInfo, ResolveInfo rInfo,
IVoiceInteractionSession voiceSession, IVoiceInteractor voiceInteractor,
IBinder resultTo, String resultWho, int requestCode, int callingPid, int callingUid,
String callingPackage, int realCallingPid, int realCallingUid, int startFlags,
ActivityOptions options, boolean ignoreTargetSecurity, boolean componentSpecified,
ActivityRecord[] outActivity, ActivityStackSupervisor.ActivityContainer container,
TaskRecord inTask) {
...
ProcessRecord callerApp = null;
...
ActivityRecord sourceRecord = null;
ActivityRecord resultRecord = null;
...
ActivityRecord r = new ActivityRecord(mService, callerApp, callingUid, callingPackage,
intent, resolvedType, aInfo, mService.mConfiguration, resultRecord, resultWho,
requestCode, componentSpecified, voiceSession != null, mSupervisor, container,
options, sourceRecord);
...
err = startActivityUnchecked(r, sourceRecord, voiceSession, voiceInteractor, startFlags,
true, options, inTask);
...
return err;
}

callerApp ,sourceRecord,resultRecord是当中比较关键的变量,但都是为变量r服务,因为它记录着整个方法杂七杂八的各种判断结果,然后带着变量r调用startActivityUnchecked方法,继续跟进。

startActivityUnchecked

1
2
3
4
5
6
7
8
9
10
11
12
13
14
15
16
17
18
19
20
21
22
23
24
private int startActivityUnchecked(final ActivityRecord r, ActivityRecord sourceRecord,
IVoiceInteractionSession voiceSession, IVoiceInteractor voiceInteractor,
int startFlags, boolean doResume, ActivityOptions options, TaskRecord inTask) {
setInitialState(r, options, inTask, doResume, startFlags, sourceRecord, voiceSession,
voiceInteractor);
computeLaunchingTaskFlags();
...
mIntent.setFlags(mLaunchFlags);
mReusedActivity = getReusableIntentActivity();
...
boolean newTask = false;
...
if (mStartActivity.resultTo == null && mInTask == null && !mAddingToTask
&& (mLaunchFlags & FLAG_ACTIVITY_NEW_TASK) != 0) {
newTask = true;
...
}
...
mTargetStack.startActivityLocked(mStartActivity, newTask, mKeepCurTransition, mOptions);
...
mSupervisor.resumeFocusedStackTopActivityLocked(mTargetStack, mStartActivity,
mOptions);
...
}

这个方法相对重要,但还不是重头戏,先看setInitialState,

setInitialState

1
2
3
4
5
6
7
8
9
10
11
12
13
14
15
16
17
18
private void setInitialState(ActivityRecord r, ActivityOptions options, TaskRecord inTask,
boolean doResume, int startFlags, ActivityRecord sourceRecord,
IVoiceInteractionSession voiceSession, IVoiceInteractor voiceInteractor) {
reset();
mStartActivity = r;
mIntent = r.intent;
mOptions = options;
mCallingUid = r.launchedFromUid;
mSourceRecord = sourceRecord;
mVoiceSession = voiceSession;
...
mLaunchSingleTop = r.launchMode == LAUNCH_SINGLE_TOP;
mLaunchSingleInstance = r.launchMode == LAUNCH_SINGLE_INSTANCE;
mLaunchSingleTask = r.launchMode == LAUNCH_SINGLE_TASK;
mLaunchFlags = adjustLaunchFlagsToDocumentMode(
r, mLaunchSingleInstance, mLaunchSingleTask, mIntent.getFlags());
...
}

这里初始化了比较重要的mStartActivity,mIntent,mCallingUid,mSourceRecord,mLaunchFlags。mLaunchFlags用来记录我们Activity的启动方式,省略部分都是根据启动方式来初始化一堆变量或进行操作。下面的方法computeLaunchingTaskFlags还是用来初始化启动标志位的,我的天!真正初始化启动方式标志位后进行设置mIntent.setFlags(mLaunchFlags)。初始化启动方式后,那么我们需要初始化Tack了,如果对启动模式有了解的同学下面的就比较好理解了,在getReusableIntentActivity方法中,我们需要去找一个可复用的ActivityRecord,那么只有启动模式为SingleInstance才能真正的复用,因为整个系统就只有一个实例。这里也列举了相邻地启动同一个Activity的情况,为什么有这种情况呢?感兴趣的同学可以试试(主要还是考验启动模式的理解)。startActivityUnchecked方法细说真的是三天三夜都说不完。继续看下面的方法吧。

startActivityLocked

1
2
3
4
5
6
final void startActivityLocked(ActivityRecord r, boolean newTask, boolean keepCurTransition,
ActivityOptions options) {
...
mWindowManager.setAppVisibility(r.appToken, true);
...
}

mWindowManager.setAppVisibility(r.appToken, true);这句话表示这个Activity已经具备了显示的条件。接下来我们长话短说,大体来看已经差不多了,通知后,我们会调用ActivityStackSupervisor的resumeFocusedStackTopActivityLocked方法,接着调ActivityStack的resumeTopActivityUncheckedLocked方法,再调自己的resumeTopActivityInnerLocked方法,如果Activity已存在需要可见状态,那么会调IApplicationThread的scheduleResumeActivity方法,且经过一系列判断可见Activity;反之调ActivityStackSupervisor的startSpecificActivityLocked的方法,那么继续会调realStartActivityLocked的方法。
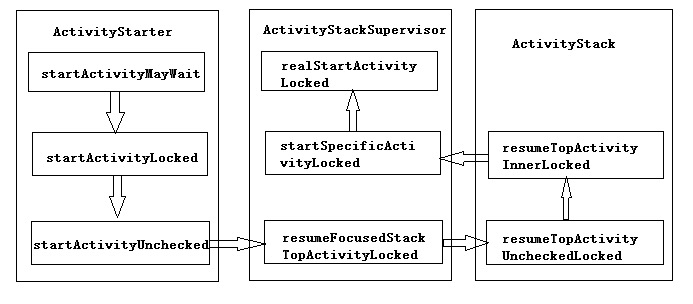
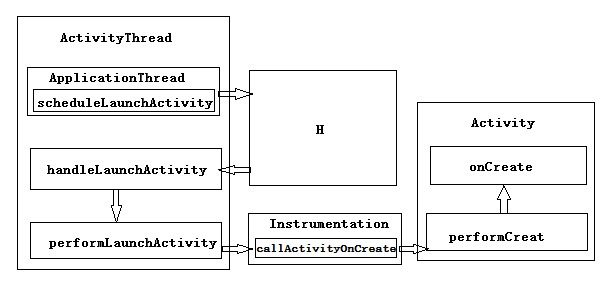
ActivityThread

终于调ApplicationThread的scheduleLaunchActivity方法啦!

scheduleLaunchActivity

1
2
3
4
5
6
7
8
9
10
11
12
13
14
15
16
17
18
19
20
21
22
23
24
25
26
27
@Override
public final void scheduleLaunchActivity(Intent intent, IBinder token, int ident,
ActivityInfo info, Configuration curConfig, Configuration overrideConfig,
CompatibilityInfo compatInfo, String referrer, IVoiceInteractor voiceInteractor,
int procState, Bundle state, PersistableBundle persistentState,
List<ResultInfo> pendingResults, List<ReferrerIntent> pendingNewIntents,
boolean notResumed, boolean isForward, ProfilerInfo profilerInfo) {
updateProcessState(procState, false);
ActivityClientRecord r = new ActivityClientRecord();
r.token = token;
r.ident = ident;
r.intent = intent;
r.referrer = referrer;
r.voiceInteractor = voiceInteractor;
r.activityInfo = info;
r.compatInfo = compatInfo;
r.state = state;
r.persistentState = persistentState;
r.pendingResults = pendingResults;
r.pendingIntents = pendingNewIntents;
r.startsNotResumed = notResumed;
r.isForward = isForward;
r.profilerInfo = profilerInfo;
r.overrideConfig = overrideConfig;
updatePendingConfiguration(curConfig);
sendMessage(H.LAUNCH_ACTIVITY, r);
}

看最后,熟悉的味道,handler发送message,那么这个handler是什么呢?有请天字第一号Handler,H。

H

1
2
3
4
5
6
7
8
9
10
11
12
13
14
15
16
private class H extends Handler {
...
public void handleMessage(Message msg) {
if (DEBUG_MESSAGES) Slog.v(TAG, ">>> handling: " + codeToString(msg.what));
switch (msg.what) {
case LAUNCH_ACTIVITY: {
Trace.traceBegin(Trace.TRACE_TAG_ACTIVITY_MANAGER, "activityStart");
final ActivityClientRecord r = (ActivityClientRecord) msg.obj;
r.packageInfo = getPackageInfoNoCheck(
r.activityInfo.applicationInfo, r.compatInfo);
handleLaunchActivity(r, null, "LAUNCH_ACTIVITY");
Trace.traceEnd(Trace.TRACE_TAG_ACTIVITY_MANAGER);
} break;
...
}
}

handleLaunchActivity

我们直接看我们发的消息,它调用了ActivityThread的handleLaunchActivity方法。

1
2
WindowManagerGlobal.initialize();//初始化WMS
Activity a = performLaunchActivity(r, customIntent);//创建并启动

performLaunchActivity

1
2
3
4
5
6
7
8
9
10
11
12
13
14
15
16
17
18
19
20
21
22
23
24
private Activity performLaunchActivity(ActivityClientRecord r, Intent customIntent) {
ActivityInfo aInfo = r.activityInfo;//取出组件信息,并一顿操作
...
Activity activity = null;
try {
java.lang.ClassLoader cl = r.packageInfo.getClassLoader();
activity = mInstrumentation.newActivity(
cl, component.getClassName(), r.intent);
//开始创建Activity实例,通过类加载器创建,看参数就知道了
...
Application app = r.packageInfo.makeApplication(false, mInstrumentation);
//获取Application
...
activity.attach(appContext, this, getInstrumentation(), r.token,
r.ident, app, r.intent, r.activityInfo, title, r.parent,
r.embeddedID, r.lastNonConfigurationInstances, config,
r.referrer, r.voiceInteractor, window);
//与window建立关联
...
mInstrumentation.callActivityOnCreate(activity, r.state, r.persistentState);
//callActivityOnCreate->activity.performCreate->onCreate,之后就很熟悉了
...
}
}
1
2
3
4
5
6
7
8
9
10
11
12
13
14
15
16
17
18
19
20
public Application makeApplication(boolean forceDefaultAppClass,
Instrumentation instrumentation) {
if (mApplication != null) {
return mApplication;
}
//如果mApplication不为空则直接返回,这也是为什么Application为单例
...
Application app = null;
...
ContextImpl appContext = ContextImpl.createAppContext(mActivityThread, this);
app = mActivityThread.mInstrumentation.newApplication(
cl, appClass, appContext);
//创建Application,跟Activity一样,都是用类加载器创建
...
mApplication = app;//保存下来
...
instrumentation.callApplicationOnCreate(app);
//callApplicationOnCreate->onCreate
...
}

您的支持是我原创的动力