HashMap是Java程序员使用频率最高的数据结构之一。另外,JDK1.8对HashMap底层的实现进行了优化,如引入红黑树的数据结构以及扩容的优化等等来提高性能。本文结合JDK1.8的源码,探讨HashMap的结构实现和功能原理。
HashMap的UML图
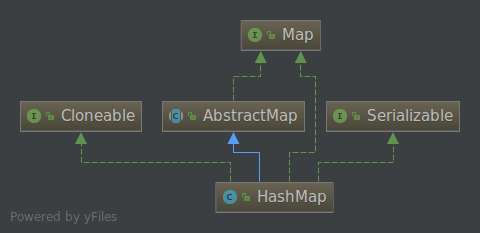
HashMap的成员变量及其含义
1 | public class HashMap<K,V> extends AbstractMap<K,V> |
聊聊HashMap的主要方法实现
内部实现
搞清楚HashMap,首先需要知道HashMap是什么,即它的存储结构-字段;其次弄明白它能干什么,即它的功能实现-方法。下面我们针对这两个方面详细展开讲解
存储结构-字段
从结构实现来讲,HashMap是数组+链表+红黑树(JDK1.8增加了红黑树部分)实现的,如下如所示。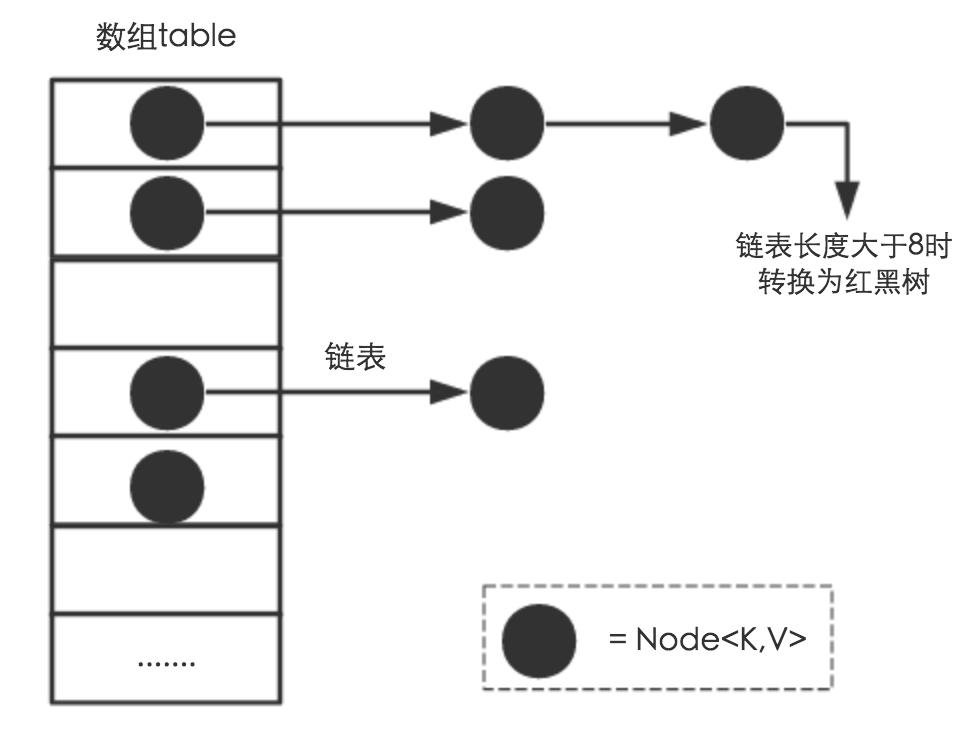
这里需要讲明白两个问题:数据底层具体存储的是什么?这样的存储方式有什么优点呢?
(1)从源码可知,HashMap类中有一个非常重要的字段,就是 Node[] table,即哈希桶数组,明显它是一个Node的数组。我们来看Node[JDK1.8]是何物。1
2
3
4
5
6
7
8
9
10
11
12
13
14static class Node<K,V> implements Map.Entry<K,V> {
final int hash; //用来定位数组索引位置
final K key;
V value;
Node<K,V> next; //链表的下一个node
Node(int hash, K key, V value, Node<K,V> next) { ... }
public final K getKey(){ ... }
public final V getValue() { ... }
public final String toString() { ... }
public final int hashCode() { ... }
public final V setValue(V newValue) { ... }
public final boolean equals(Object o) { ... }
}
Node是HashMap的一个内部类,实现了Map.Entry接口,本质是就是一个映射(键值对)。上图中的每个黑色圆点就是一个Node对象。
(2)HashMap就是使用哈希表来存储的。哈希表为解决冲突,可以采用开放地址法和链地址法等来解决问题,Java中HashMap采用了链地址法。链地址法,简单来说,就是数组加链表的结合。在每个数组元素上都一个链表结构,当数据被Hash后,得到数组下标,把数据放在对应下标元素的链表上。例如程序执行下面代码:1
map.put("name","value");
系统将调用”name”这个key的hashCode()方法得到其hashCode 值(该方法适用于每个Java对象),然后再通过Hash算法的后两步运算来定位该键值对的存储位置,有时两个key会定位到相同的位置,表示发生了Hash碰撞。当然Hash算法计算结果越分散均匀,Hash碰撞的概率就越小,map的存取效率就会越高。1
2
3
4
5
6
7/**
* 计算key的hash值。
*/
static final int hash(Object key) {
int h;
return (key == null) ? 0 : (h = key.hashCode()) ^ (h >>> 16);
}
当然如果哈希桶数组很大,即便是较差的hash算法也会比较分散,有较好的效果,然而,如果哈希桶数组数组很小,即使好的Hash算法也会出现较多hash碰撞,因此就需要在空间成本和时间成本之间权衡,其实就是在根据实际情况确定哈希桶数组的大小,并在此基础上设计好的hash算法减少Hash碰撞。那么通过什么方式来控制map使得Hash碰撞的概率又小,哈希桶数组(Node[] table)占用空间又少呢?答案就是好的Hash算法和扩容机制。
HashMap的扩容机制就是通过threshold = length * Load factor来做是否进行扩容的决策。也就是说,在数组定义好长度之后,负载因子越大,所能容纳的键值对个数越多。当然,负载因子也不是越大越好,JDK设计者给出了一个相对来说比较均衡的方案,Load factor为负载因子(默认值是0.75),一般我们不对这个参数做修改。
功能实现-方法
HashMap的内部功能实现很多,本文主要选取从根据key获取HashMap数组索引、put方法的执行、扩容、获取HashMap对应key的值等几个具有代表性的点深入展开讲解。
确定哈希桶数组索引位置
不管增加、删除、查找键值对,定位到哈希桶数组的索引都是很关键的第一步。HashMap的数据结构是数组和链表或者红黑树的结合,所以我们希望这个HashMap里面的元素位置尽量分布均匀,使得每个位置上的元素数量只有一个,那么当我们用hash算法求得这个位置的时候,就可以马上找到,不用遍历链表,查询的时间复杂度也仅仅是O(n)。我们来看看源码的实现:1
2
3
4
5
6
7
8
9// 方法1,代码段1
static final int hash(Object key) {
int h;
return (key == null) ? 0 : (h = key.hashCode()) ^ (h >>> 16);
}
// 当我们使用hash时,代码段2
if ((p = tab[i = (n - 1) & hash]) == null)
tab[i] = newNode(hash, key, value, null);
这里的Hash算法本质上就是三步:取key的hashCode值、高位运算、取模运算。
分析HashMap的put方法
①.判断键值对数组table[i]是否为空或为null,否则执行resize()进行扩容;
②.根据键值key计算hash值得到插入的数组索引i,如果table[i]==null,直接新建节点添加,转向⑥,如果table[i]不为空,转向③;
③.判断table[i]的首个元素是否和key一样,如果相同直接覆盖value,否则转向④,这里的相同指的是hashCode以及equals;
④.判断table[i] 是否为treeNode,即table[i] 是否是红黑树,如果是红黑树,则直接在树中插入键值对,否则转向⑤;
⑤.遍历table[i],判断链表长度是否大于8,大于8的话把链表转换为红黑树,在红黑树中执行插入操作,否则进行链表的插入操作;遍历过程中若发现key已经存在直接覆盖value即可;
⑥.插入成功后,判断实际存在的键值对数量size是否超多了最大容量threshold,如果超过,进行扩容。1
2
3
4
5
6
7
8
9
10
11
12
13
14
15
16
17
18
19
20
21
22
23
24
25
26
27
28
29
30
31
32
33
34
35
36
37
38
39
40
41
42
43
44
45
46
47
48
49
50final V putVal(int hash, K key, V value, boolean onlyIfAbsent,
boolean evict) {
Node<K,V>[] tab; Node<K,V> p; int n, i;
// 步骤①:tab为空则创建
if ((tab = table) == null || (n = tab.length) == 0)
n = (tab = resize()).length;
// 步骤②:计算index,并对null做处理
if ((p = tab[i = (n - 1) & hash]) == null)
tab[i] = newNode(hash, key, value, null);
else {
Node<K,V> e; K k;
// 步骤③:节点key存在,直接覆盖value
if (p.hash == hash &&
((k = p.key) == key || (key != null && key.equals(k))))
e = p;
// 步骤④:判断该链为红黑树
else if (p instanceof TreeNode)
e = ((TreeNode<K,V>)p).putTreeVal(this, tab, hash, key, value);
// 步骤⑤:该链为链表
else {
for (int binCount = 0; ; ++binCount) {
if ((e = p.next) == null) {
p.next = newNode(hash, key, value, null);
//链表长度大于8转换为红黑树进行处理
if (binCount >= TREEIFY_THRESHOLD - 1) // -1 for 1st
treeifyBin(tab, hash);
break;
}
// key已经存在直接覆盖value
if (e.hash == hash &&
((k = e.key) == key || (key != null && key.equals(k))))
break;
p = e;
}
}
if (e != null) { // existing mapping for key
V oldValue = e.value;
if (!onlyIfAbsent || oldValue == null)
e.value = value;
afterNodeAccess(e);
return oldValue;
}
}
++modCount; // 用来实现迭代时被修改的快速失败策略
// 步骤⑥:超过最大容量 就扩容
if (++size > threshold)
resize();
afterNodeInsertion(evict);
return null;
}
扩容机制的实现
扩容(resize)就是重新计算容量,向HashMap对象里不停的添加元素,当HashMap对象内部的数组长度 大于DEFAULT_LOAD_FACTOR * DEFAULT_INITIAL_CAPACITY ,HashMap就需要扩大数组的长度,以便能装入更多的元素。方法是使用一个新的数组代替已有的容量小的数组。
我们分析下resize的源码,鉴于JDK1.8融入了红黑树,较复杂,为了便于理解我们仍然使用JDK1.7的代码,好理解一些,本质上区别不大,具体区别后文再说。1
2
3
4
5
6
7
8
9
10
11
12
13
14
15
16
17
18
19
20
21
22
23
24
25
26
27
28
29
30
31
32
33
34
35
36
37
38
39
40
41
42
43
44
45
46
47
48
49
50
51
52
53
54
55
56
57
58
59
60
61
62
63
64
65
66
67
68
69
70
71
72
73
74
75
76
77
78
79
80
81
82final Node<K,V>[] resize() {
Node<K,V>[] oldTab = table;
int oldCap = (oldTab == null) ? 0 : oldTab.length;
int oldThr = threshold;
int newCap, newThr = 0;
if (oldCap > 0) {
// 超过最大值就不再扩充了
if (oldCap >= MAXIMUM_CAPACITY) {
threshold = Integer.MAX_VALUE;
return oldTab;
}
// 没超过最大值,就扩充为原来的2倍
else if ((newCap = oldCap << 1) < MAXIMUM_CAPACITY &&
oldCap >= DEFAULT_INITIAL_CAPACITY)
newThr = oldThr << 1; // double threshold
}
else if (oldThr > 0) // initial capacity was placed in threshold
newCap = oldThr;
else { // zero initial threshold signifies using defaults
newCap = DEFAULT_INITIAL_CAPACITY;
newThr = (int)(DEFAULT_LOAD_FACTOR * DEFAULT_INITIAL_CAPACITY);
}
// 计算新的resize上限
if (newThr == 0) {
float ft = (float)newCap * loadFactor;
newThr = (newCap < MAXIMUM_CAPACITY && ft < (float)MAXIMUM_CAPACITY ?
(int)ft : Integer.MAX_VALUE);
}
threshold = newThr;
({"rawtypes","unchecked"})
Node<K,V>[] newTab = (Node<K,V>[])new Node[newCap];
table = newTab;
if (oldTab != null) {
// 把每个bucket都移动到新的buckets中
for (int j = 0; j < oldCap; ++j) {
Node<K,V> e;
if ((e = oldTab[j]) != null) {
oldTab[j] = null;
if (e.next == null)
newTab[e.hash & (newCap - 1)] = e;
//
else if (e instanceof TreeNode)
((TreeNode<K,V>)e).split(this, newTab, j, oldCap);
else { // 链表优化重hash的代码块
Node<K,V> loHead = null, loTail = null;
Node<K,V> hiHead = null, hiTail = null;
Node<K,V> next;
do {
next = e.next;
// 原索引
if ((e.hash & oldCap) == 0) {
if (loTail == null)
loHead = e;
else
loTail.next = e;
loTail = e;
}
// 原索引+oldCap
else {
if (hiTail == null)
hiHead = e;
else
hiTail.next = e;
hiTail = e;
}
} while ((e = next) != null);
// 原索引放到bucket里
if (loTail != null) {
loTail.next = null;
newTab[j] = loHead;
}
// 原索引+oldCap放到bucket里
if (hiTail != null) {
hiTail.next = null;
newTab[j + oldCap] = hiHead;
}
}
}
}
}
return newTab;
}
HashMap中根据key获取value代码实现
相比于上面几个,HashMap中获取value相对来说就简单许多,基本逻辑就是根据key算出hash值定位到哈希桶的索引,当可以就是当前索引的值则直接返回其对于的value,反之用key去遍历equal该索引下的key,直到找到位置。1
2
3
4
5
6
7
8
9
10
11
12
13
14
15
16
17
18
19final Node<K,V> getNode(int hash, Object key) {
Node<K,V>[] tab; Node<K,V> first, e; int n; K k;
if ((tab = table) != null && (n = tab.length) > 0 &&
(first = tab[(n - 1) & hash]) != null) {
if (first.hash == hash && // always check first node
((k = first.key) == key || (key != null && key.equals(k))))
return first;
if ((e = first.next) != null) {
if (first instanceof TreeNode)
return ((TreeNode<K,V>)first).getTreeNode(hash, key);
do {
if (e.hash == hash &&
((k = e.key) == key || (key != null && key.equals(k))))
return e;
} while ((e = e.next) != null);
}
}
return null;
}
HashMap的线程安全问题
在多线程使用场景中,应该尽量不要使用线程不安全的HashMap,而应该使用线程安全的ConcurrentHashMap。那么HashMap线程不安全的性质表现在哪里呢?下面来分析一下并发场景下使用HashMap可能造成死循环的问题。在HashMap的resize方法中,我们可以看到1
2
3
4
5
6
7
8
9
10
11
12
13
14
15
16
17
18
19
20Node<K,V> loHead = null, loTail = null;
Node<K,V> hiHead = null, hiTail = null;
Node<K,V> next;
do {
next = e.next;
if ((e.hash & oldCap) == 0) {
if (loTail == null)
loHead = e;
else
loTail.next = e;
loTail = e;
}
else {
if (hiTail == null)
hiHead = e;
else
hiTail.next = e;
hiTail = e;
}
} while ((e = next) != null);
小结
(1) 扩容是一个特别耗性能的操作,因此初始化HashMap的时候给一个数值,避免map频繁的扩容情况的额发生。
(2) 负载因子是可以修改的,但是建议一般情况下不要轻易修改。
(3) HashMap是线程不安全的,不要在并发的环境中使用HashMap,建议使用ConcurrentHashMap或者Collections.synchronizedMap()中的。
(4) JDK1.8引入红黑树在很大程度优化了HashMap的性能。